Archive

DIY

I like to make things.  I like parties.  My original plan for Penny’s party this year was to convert our back yard into Pixie Hollow.  I was going to make fairy houses out of tents, flowers the size of Brett, and let kiddos run around our house in fairy wings.  I tend to go a little too far some times.

After chatting about Penny’s birthday with senor Brettles we decided that we could throw an epic Tinkerbell party…ooooor we could take Penny to meet the actual Tinkerbell!  Thus, the plot to take this little to Disneyland was hatched.

After looking at our September we realized there was just no way to fit a d-land trip in on her actual birthday, or even her birthday month at all.  Sadly, we decided to push it to a Christmas trip of sorts, let her see the snow and cheer and all that jazz.

So…now what?

My desire to throw a giant party in the middle of summer really has left me. so in lieu of such an event we’re going to just throw a tiny little party with or immediate family.

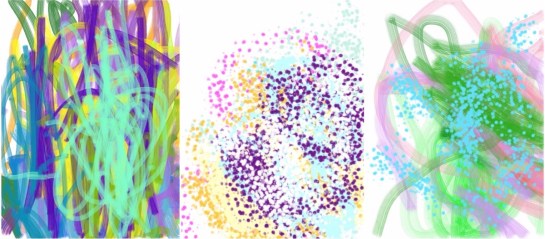
We have been finger painting up a storm and there are TONS of papers strewn around our kitchen table that look a lot like this.

IMG_2679 IMG_2680

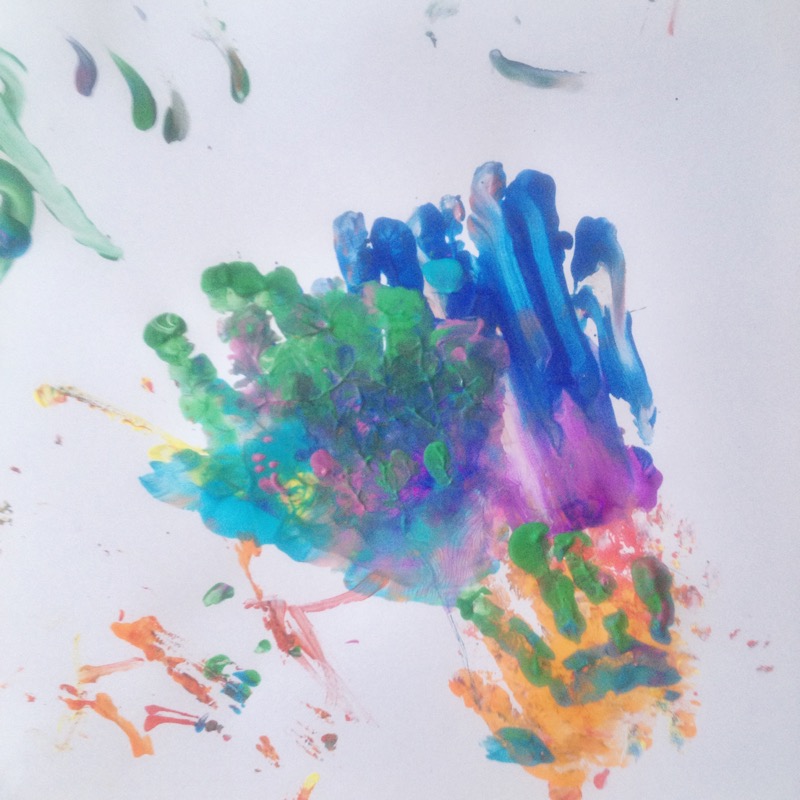
I don’t necessarily want to save every single one (there’s like 50 at this point) thus,  a new theme was born!  I grabbed a giant circle punch (like we all have lying around) and some natural colored paper.  I cut a whole in the top piece of paper and made a little window highlighting Penny’s little art work.

IMG_2678

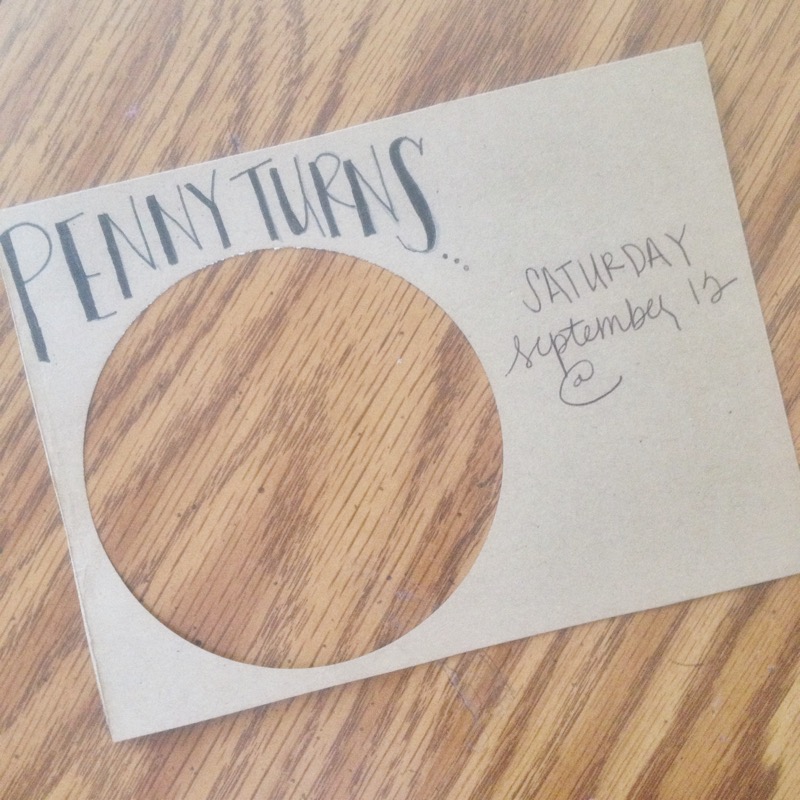
Stacked the two papers on top with a little glue action and wrote in the deets with a sharpie.

This was a super fast little invite with about as much effort as I’m willing to offer up these days.  Penny did most of the work, I just helped assemble.  I sort of love the idea of us working on these sorts of things together from now on.  I can’t wait to hear the things she comes up for future birthdays.  She’s pretty creative already.

IMG_2664

This is not the only project, theres a banner situation working its self out in my brain.  And I’m going to be pinterest-ing it up looking for painting party ideas.  We’ll see what comes out of this small burst of birthday planning.

Happy Friday!

I definitely try my best to use as little technology with Penny as possible.  I’m pretty sure I was the last person to get an iphone, I will NEVER read a book that is not printed on paper, and I do not like to write with my fingertip.  I like making things with my hands and I want Penny to enjoy that growing up as well.  I’m not gonna lie…we watch a lot of Daniel Tiger and I do a lot of my artwork using programs that are super awesome, so I’m totally not saying all technology is banned in our home. But when it comes to Penny doing art projects, no technology for us!  Mainly because I want her to know what paper and pens are.  I want her to learn how to hold a paint brush and to get her hands a little dirty creating.

My daughter has had an intense growing interest in art.  She rarely requests anything other than “PAINT!” these days…which i LOVE.  But, some days I really just don’t want to deal with cleaning up after the little artist.  So against my pre set rules for ipad use, I’ve let her start doodling with the app Sketchbook.  I don’t feel too bad about it, because I have her use a stylus so she’s still getting that pen holding technique down.  So I thought I’d share a fun little project that is…DUN DUN DUN…solely with apps!

I pick the paint brush style and Penny asks for new colors as she pleases, and we’ve ended up with some of these fun looking little pieces of artwork.

FullSizeRender-4 FullSizeRender-5

If you can see the occasional arc in those…those are definitely “rainbows” according to Penny.

I decided to run the little “paintings” through the AfterLight app.  This is my favorite app for editing photos and it also has super awesome borders you can use, including the alphabet, so this got me thinking.  What could we spell out with these bad boys?  After messing around a bit, I made these little examples.

IMG_0816

IMG_0821

I may use the little x’s and o’s as Valentines Day cards for Pennys friends and family this year.

The great thing about a project like this is, there are SO many things you could do!  You can print them out individually at your nearest photo printing store and put them in square frames.  Or you can use pic stitch and make a square print of a 4-letter word.  You can spell out your childs name in their room from their own artwork, or I thought of making Pen a little art corner and printing out the word CREATE.  Seriously…you can do anything with it.

It’s such a fun way to display your kids art work, even if it is completely created through that stinky ol ipad.  And I have to add…these arent too shabby for a nearly 2 year old.

Image-1-3

I feel lame even sharing about this, because it is like, stupid simple.  But sometimes its about the little things.  Right?

I have like a billion rolls of half used washi tape just laying around the house.  Okay…not a billion…I sorta wish…but I have a lot.  I get bored with our furniture a lot and our kitchen table was just feeling sort of bleh one day.  So I snagged some orange stripy tape, and some mint patterned tape and just taped it right onto the table.

Image-1-4

Image-1

It’s totally temporary and think of the possibilities!  I also love that if something gets on it you can just pull it off and throw it away.  You can totally do more than just stripes too.  I think this could get pretty fun near the Holidays.  Such an easy and quick way to spruce up your table real quick!

Also it should be noted that I set the table and added fruit to our bowl before I took these photos.  Lets be real.  I have a nearly two year old who is coloring, play doh-ing, and pasta-ing on this table on the daily.  Thus the need to be able to just pull it off and toss it! As I look at Penny and think “this is why we don’t have nice things!”.

What other things are you using washi tape for, around the house?  Or…is it just me…

FullSizeRender-2

Okay I may be just catching on to this, but I found out this super rad secret the other day.  I say secret, but really I just googled a question and found an answer. Did you know that you can make foamy milk, for a latte, at home, with no espresso machine? What? I didn’t and my life is forever changed.  So if there are any other coffee fanatics out there who didn’t know this either, I’m here to teach you.  I think I’ve perfected it at this point. What cha need:

  • coffee (duh)
  • milk
  • a jar of sorts (i use my husbands blender bottle or one of pennys sippy cups…cuz…classy.)
  • a spoon

What cha do:

  • brew dat coffee and pour it in yo cup (just like any other day)
  • pour some milk in your jar and shake shake shake it up…make sure its nice and bubbly
  • take the lid off your jar and microwave for 30 seconds
  • remove jar and tap it on your counter a few times.  tamping it down gets the foam to settle and be less bubbles, more thick barista skilled foam
  • take a spoon and hold back the foam.  get your coffee nice and milky.
  • scoop foam out of jar and flop it on top.

VIOALA!  A latte of sorts right from your kitchen.  Once I found this out Ive been sort of switching my daily black cup for a little bit “fancier” latte in the morning.  It makes it feel special…when really it’s just dunkin’ donuts french vanilla and a little low fat.  But, hey, whatever perks the day

Happy Monday friends.  Go get ’em.

I’ve been wanting to put some family photos up for a while now, but I wanted to do something a little different.  I’ve done the whole gallery wall thing, and the GIANT statement piece thing, and I wanted something new. Theres a little wall space above our record player and my original thought was to get some square frames and do a little 9 photo sort of dealio.  Then, on one of my many trips to Target with the Penster, I stumbled upon these super cute binder clips.  I wanted them and needed a reason to have them,  this sorta got my brain going.  So I bought them, because…Target. IMG_1997 I’m a little bit of a craft binger.  When I have an idea, it needs to be done now.  Preferably with no extra trips to the store and no well planned out methods.  Which makes me a bit of a corner cutter.  Some times it works, some times it doesnt, but in this case it turned out pretty well. I had one left over 1x from our pallet deck project.  So I harrassed brett to cut it down into 3 even pieces because I’m annoying and I don’t quite trust myself yet with unsupervised power tool usage yet (soon.).  I like the natural wood, but it doesnt really go with anything in our house.  Plus I’m trying to suddely switch to everything black, white, and metalic (because pinterest told me to).  I had no sort of stain, so I just grabbed some black acrylic paint and water.  I watered the paint down pretty well, and then just layered it on until I was happy with it.  This was way better than just painting it completely black, because i got to keep the woodgrain in there as well.  It sorta got me thinking what else in my house I could “stain” but thats a whole different set of posts… IMG_2002IMG_1644 After letting the paint dry for a while.  I got out 9 binder clips and hot glued them to the boards.  I just eye balled it and put them where I thought they looked good.  In hind sight, I wish I would have set them further apart,  I didnt take in account the spacing for 8×8 photos. In order to get these guys up on the wall I took a tiny drill bit and put holes on either side of the wood and then nailed right through it.  These are definitely light weight enough for that to work.  If you use sturdier wood you may have to us an anchor and screws, but for this type of project my impatient unplanned ways worked just fine. Then I found 9 of my favorite photos and had them printed in 8×8 from Walgreens. Usually I would have just gone through postal pix or any other app from my phone, but the problem with that is some of my photos are super edited and because of “low quality” they wont print them for you.  Which is great that these companies want you to have great quality photos, but honestly, I do not give a rip if my photos are slightly grainy.  You do you, I’ll do me. In the end, I’m so happy with how it turned out.  I love that we can trade photos in and out of it as well.  Anything that can be changed up every now and then is a-okay with me. IMG_2001 This project cost me about $30 and that was mainly the cost of the photos.  I had everything else on hand.  If I include the cost of what I had laying around it would be about $35, so it’s super affordable and super quick to make. I have some other home projects lined up that I’m SUPER excited about!  I can’t wait to share!  What are some of your favorite ways to display family photos?

On mothers day this year I wanted to make some little gifts for a set of moms that have become very special to me in our new hometown.  I have seen a bunch of little rock succulents around pinterest and have been dying to try it.

IMG_1937

All you need:

  • Rocks
  • Acrylic Paints
  • Small Clay Pots
  • Yarn
  • Hot Glue/Gun

What ya do:

  • Paint your rocks and assortment of greens.
  • When they dry take some white paint and make little marks for the pricklies
  • place rocks 3 – 4 rocks in the pot
  • make a yarn pom and hot glue onto one little cactus

Thats it.  I stuffed a little bit of fluff in the bottom, but it would be even cuter with some gravel holding them in. This is a super simple little gift and its totally affordable too!  They would be really cute as center pieces for a party and you could really use any container to add a fun little spin on it. Now go make your friend a succulent that wont die!  Those are my favorite kind!

We have a pretty decent yard at our place.  To us it feels like its the biggest yard in the world, because we’re so used to apartment living and our tiny patios that come with it.  Part of the yard is a huge side yard space that was pretty much FULL of weeds.  And most likely…bugs.  Gross.  Lucky for us, my father in law works in a place that has an endless supply of free pallets, so that got me thinking.  Pallet deck!  It was the perfect solution for us because we rent, and we do NOT wanna drop a bunch of money into a yard that we most likely will not be hanging out in in a couple years.  I figured we could use the same technique with the coffee table we built a while back.

2015-05-02 12.02.05

In my mind this was going to take, like, a Saturday.  I, of course, was a little over zealous.   It took us all Saturday and Sunday, several trips to lowes, and it’s not perfect…but we love it anyway.

Our original plan was to line all of the pallets up and then string them together with scrap wood.  Unfortunately, not all pallets are the same, and not every single one lined up perfectly, but we made it work.  I don’t think we could put a billion people on it and have a dance party, but I’ve sat out in the sun with an iced coffee and it worked just fine.

2015-05-02 13.00.54

At the end of the day, we spent about $70.  Thats including the cost of screws, wood, and sealer to help with weathering.  I wish I had more step by step instructions, but I’m more of a fly by the seat of my pants kinda gal.  We lined up the pallets  so they fit well together and then just filled in the cracks with the new wood.  Boom!  You got yourself a deck.

2015-05-03 17.50.03

As a bonus project I spray painted an old beat up patio set, and it gave it a little extra life.  A weekend well spent indeed.  Now lets have a BBQ!

I have been planning on building a coffee table since before we moved.  I even gave the coffee table we had away, to motivate myself.  We are very much a family that eats in the living room.  We watch A LOT of movies, and we usually eat dinner on the coffee table.  So, with my hasty furniture give away, and my mega procrastination, we’ve been eating (GASP!) at the dinner table.

Until today!  One of the people I’ve grown quite attached to up here, is Brett’s cousin April.  She really has become a pretty great friend to me and BONUS she has power tools and sweet sweet ideas.

Thus, our coffee table was created! And I’m sort of obsessed.

Image-1-6

Image-1-5

Image-1-4

Image-1-2

We cut down a pallet and cut scrap wood down to fill the gaps, which was much easier than breaking the entire pallet down.  We did a dark stain all over, but when I got it home I felt like it was missing something.  So, I took a chance and slopped some gold paint on the smaller planks.  I’m so happy and I feel like it really completes our living room!  Furniture is so hard to commit to, for me, and I love this more than anything I was thinking about buying.  PLUS!  It was 100% free!  Thanks April!

I’m taking a chance and really trusting my toddler with a mug of flowers.  So far she’s doing super well and touching with one finger, but the eagerness in her face tells me I may come into a room full of shredded petals.  Only time will tell!

IMG_0266

I like to make things.

a lot.

I am sad to say that after having penny it takes me a WHOLE lot to muster up enough energy to make anything.  I got ideas…so. many. ideas.  but when penny is asleep and brett is out of the house, what I end up doing most is just sitting. and staring.  you know how everyones big advice when having children is “sleep when they sleep”?  in theory, that sounds great!  but when she is sleeping I want to stay awake and enjoy the silence.  I want to be aware that I have nothing to do.  I want to feel the nothingness and soak it up so that when she is awake again im not like…dang…I slept through my rest!?!

anywho…ive been getting the urge lately.  you know…that diy feelin.

so I made a michaels run with my dear friend faith and bought some canvases…one of which is a 40X60 BEAST that I have GREAT plans for.  of which I only paid 40 bucks for because michaels was having an absurd 65% off canvas sale.  WHAT!

so with my 2 other little canvases I decided to make a little simple something for our bedroom.

brett and I are kind of a mushy pair.  we are definitely THAT couple that says “I love you” probably a little too much.  one of my favorite things that we have been doing since we first started dating, is whenever we say good bye…he shouts out “YOU’RE BEAUTIFUL!” and I reply “YOUR HANDSOME!”  I’m quite fond of this little farewell, so I took literally like 10 minutes and made it into some bedside “art work”.

download

If you are curious at all, our headboard was made by my dad and was actually our back drop on our wedding day!  I have SO many other home projects planned.  At the rate I’m going I’ll most likely finish one project every 6 months or so. Hopefully my creative spurts will be more frequent than that.

this weekend was…heaven.  we did nothing.  we cleaned a little.  we ate at home.  there was a target trip somewhere in there.  but mostly we watched movies and laid down all day.  it was perfect.

on saturday morning, brett and i made pancakes for the very first time.  i know.  why this long?  the truth is…i dont really like pancakes, unless they are my sis in laws punkin pancakes that she makes for my brother (and on rare occasions i get to partake.  those are damn good pancakes my siz!).  i’m thinkin penny loves pancakes because they were gooooOOOOood.  we got to sit and have a little fam breakfast with bretts bro and we felt so fancy with our pancakes, eggs, and breakfast potatoes (it doesnt take much).

pannycakes

ive been having extreme nesting mind.  i say extreme because it is not limited to our little girls room.  no no no, that would be too simple.  i actually said this to brett the other day “hey babe, do you think our landlords would be mad if we took our cabinets out of the kitchen?” to which he lovingly replied “yes, i dont think they would be too happy about that.”  eff nesting yall…i want to RENOVATE.  everything.  because the things i have in mind are all sort of grand i have done nothing.  which is super productive.

but on saturday i got my craft on.  i spent some time outside reading the other day, and brett had left a bike wheel on our patio.  its been sitting there for a couple of months and i weirdly enjoyed the way it looked out there.  i started to think about what we could do with this thing.  it started to get dark outside and my reading time was dwindling and i though…man i wish we had like a lamp out here.  IDEA!  bike wheel chandelier!

wheel

i spent most of the afternoon wrapping yarn around the wheel, and around the wire that would hold it up.  our plan is to get some battery operated led lights (soft white, because i hate that bright white biznass) and wrap them around the tire.  i think it will add a little bit of fun and definitely some much needed light on our patio.  we can move our scrabble games outside long after the sun has gone down : )

wheel2

hopefully i’ll finish this soon and i can update you with some pictures of it in action.  how this project helped brett and i prepare for penny, i have no idea.  but it eased my nesting mind for a moment.  just…a moment.

happy monday friends, hope your weekend was whatever you needed!  i know ours was : )

Design a site like this with WordPress.com
Get started