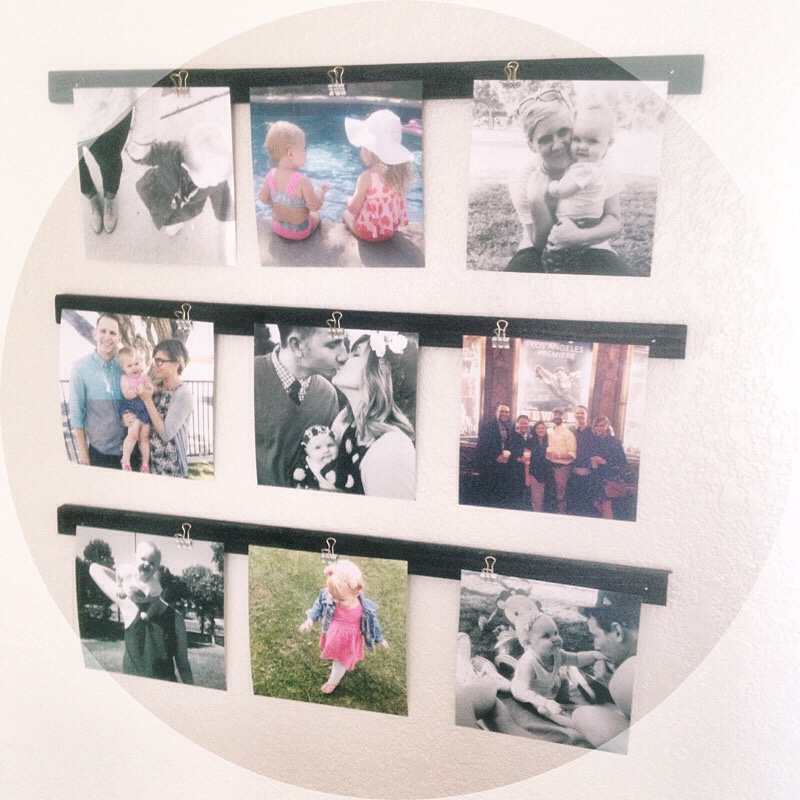
I’ve been wanting to put some family photos up for a while now, but I wanted to do something a little different. I’ve done the whole gallery wall thing, and the GIANT statement piece thing, and I wanted something new. Theres a little wall space above our record player and my original thought was to get some square frames and do a little 9 photo sort of dealio. Then, on one of my many trips to Target with the Penster, I stumbled upon these super cute binder clips. I wanted them and needed a reason to have them, this sorta got my brain going. So I bought them, because…Target.  I’m a little bit of a craft binger. When I have an idea, it needs to be done now. Preferably with no extra trips to the store and no well planned out methods. Which makes me a bit of a corner cutter. Some times it works, some times it doesnt, but in this case it turned out pretty well. I had one left over 1x from our pallet deck project. So I harrassed brett to cut it down into 3 even pieces because I’m annoying and I don’t quite trust myself yet with unsupervised power tool usage yet (soon.). I like the natural wood, but it doesnt really go with anything in our house. Plus I’m trying to suddely switch to everything black, white, and metalic (because pinterest told me to). I had no sort of stain, so I just grabbed some black acrylic paint and water. I watered the paint down pretty well, and then just layered it on until I was happy with it. This was way better than just painting it completely black, because i got to keep the woodgrain in there as well. It sorta got me thinking what else in my house I could “stain” but thats a whole different set of posts…
 After letting the paint dry for a while. I got out 9 binder clips and hot glued them to the boards. I just eye balled it and put them where I thought they looked good. In hind sight, I wish I would have set them further apart, I didnt take in account the spacing for 8×8 photos. In order to get these guys up on the wall I took a tiny drill bit and put holes on either side of the wood and then nailed right through it. These are definitely light weight enough for that to work. If you use sturdier wood you may have to us an anchor and screws, but for this type of project my impatient unplanned ways worked just fine. Then I found 9 of my favorite photos and had them printed in 8×8 from Walgreens. Usually I would have just gone through postal pix or any other app from my phone, but the problem with that is some of my photos are super edited and because of “low quality” they wont print them for you. Which is great that these companies want you to have great quality photos, but honestly, I do not give a rip if my photos are slightly grainy. You do you, I’ll do me. In the end, I’m so happy with how it turned out. I love that we can trade photos in and out of it as well. Anything that can be changed up every now and then is a-okay with me.
  This project cost me about $30 and that was mainly the cost of the photos. I had everything else on hand. If I include the cost of what I had laying around it would be about $35, so it’s super affordable and super quick to make. I have some other home projects lined up that I’m SUPER excited about! I can’t wait to share! What are some of your favorite ways to display family photos?